首页 > Spring MVC
Spring MVC拦截器
拦截器(Interceptor)是 Spring MVC 提供的一种强大的功能组件。它可以对用户请求进行拦截,并在请求进入控制器(Controller)之前、控制器处理完请求后、甚至是渲染视图后,执行一些指定的操作。
在 Spring MVC 中,拦截器的作用与 Servlet 中的过滤器类似,它主要用于拦截用户请求并做相应的处理,例如通过拦截器,我们可以执行权限验证、记录请求信息日志、判断用户是否已登录等操作。
Spring MVC 拦截器使用的是可插拔式的设计,如果我们需要某一拦截器,只需在配置文件中启用该拦截器即可;如果不需要这个拦截器,则只要在配置文件中取消应用该拦截器即可。
Spring MVC 在 org.springframework.web.servlet 包中提供了一个 HandlerInterceptor 接口,该接口包含 3 个方法,如下表。
我们可以通过实现 HandlerInterceptor 接口,重写其方法,来实现对拦截器类的定义,示例代码如下。
在 Spring MVC 的配置文件中,<mvc:interceptors> 标签用于定义一组拦截器,其包含多个常用的子标签,具体说明如下表。
在了解完 <mvc:interceptors> 标签及其子标签的含义后,接下来我们就来讲解如何通过它们来对拦截器进行定义。
注意:<mvc:interceptors> 标签的 <ref> 子标签不能单独使用,它需要与 <bean> 标签(<mvc:interceptors> 标签内或<mvc:interceptors>标签外)或 @Component 等注解配合使用,以保证 <ref> 标签配置的拦截器是Spring IOC 容器中的组件。
需要注意的是,在 <mvc:interceptor> 中,子元素必须按照上述代码的配置顺序进行编写,即
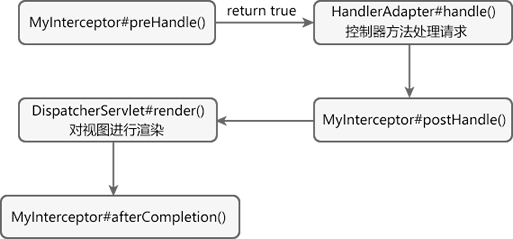
图1:单个拦截器处理流程
拦截器处理流程的步骤如下:
1. 新建一个名为 springmvc-interceptor-demo 的 Web 工程,并将与 Spring MVC 相关的依赖引入到工程中,其 web.xml 的配置内容如下。
2. 在 src 目录下(类路径下)新建一个 Spring MVC 的配置文件:springMVC.xml,配置内容如下。
3. 在 net.biancheng.c.interceptor 包下,新建一个自定义拦截器类 MyInterceptor,代码如下。
4. 在 webapp/WEB-INF 目录下,新建一个 templates 目录,并在该目录下新建一个 success.html,代码如下。
5. 将 springmvc-interceptor-demo 部署到 Tomact 中并启动,启动完成后,使用浏览器访问“http://localhost:8080/springmvc-interceptor-demo/hello”,结果如下图。
6. 查看控制台,控制台输出如下。
假设一个项目中包含两个不同的拦截器:Interceptor1 和 Interceptor2,它们在配置文件中定义的顺序为:Interceptor1 → Interceptor2。下面我们就通过一个拦截器流程图来描述下多个拦截器的执行流程。
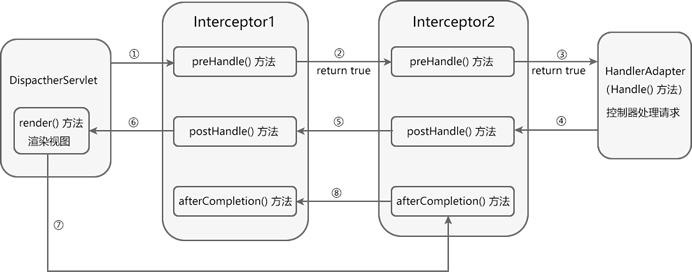
图3:多个拦截器的执行流程
从上面的执行流程图可以看出,当存在多个拦截器同时工作时,它们的 preHandle() 方法会按照拦截器在配置文件中的配置顺序执行,但它们的 PostHandle() 和 afterCompletion() 方法则会按照配置顺序的反序执行。
如果其中有拦截器的 preHandle() 方法返回了 false,各拦截器方法执行情况如下。
1. 在springmvc-interceptor-demo 的 net.biancheng.c.interceptor 包中,除了示例 1 中创建的 MyInterceptor 外,再创建两个拦截器类:MyInterceptor2 和 MyInterceptor3。
拦截器类 MyInterceptor2 的代码如下。
拦截器类 MyInterceptor3 的代码如下。
2. 修改 Spring MVC 配置文件 springMVC.xml 的内容,在 <mvc:interceptors> 标签中增加 MyInterceptor2 和 MyInterceptor3 的配置,代码如下。
3. 重启 Tomcat 服务器,并使用浏览器访问“http://localhost:8080/springmvc-interceptor-demo/hello”,控制台输出如下。
从控制台输出的内容可知:
在 Spring MVC 中,拦截器的作用与 Servlet 中的过滤器类似,它主要用于拦截用户请求并做相应的处理,例如通过拦截器,我们可以执行权限验证、记录请求信息日志、判断用户是否已登录等操作。
Spring MVC 拦截器使用的是可插拔式的设计,如果我们需要某一拦截器,只需在配置文件中启用该拦截器即可;如果不需要这个拦截器,则只要在配置文件中取消应用该拦截器即可。
定义拦截器
想要在 Spring MVC 项目中使用拦截器,第一步就是要对拦截器类进行定义。Spring MVC 在 org.springframework.web.servlet 包中提供了一个 HandlerInterceptor 接口,该接口包含 3 个方法,如下表。
| 方法名 | 返回值 | 说明 |
|---|---|---|
| preHandle () | boolean |
该方法在控制器方法之前执行,其返回值用来表示是否中断后续操作。
|
| postHandle () | void | 该方法会在控制器方法调用之后,解析式图之前执行。我们可以通过此方法对请求域中的模型(Model)数据和视图做出进一步的修改。 |
| afterCompletion () | void | 该方法会在整个请求完成后,即视图渲染结束之后执行。我们可以通过该方法实现资源清理、日志记录等工作。 |
我们可以通过实现 HandlerInterceptor 接口,重写其方法,来实现对拦截器类的定义,示例代码如下。
package net.biancheng.c.interceptor;

import org.springframework.web.servlet.HandlerInterceptor;
import org.springframework.web.servlet.ModelAndView;

import javax.servlet.http.HttpServletRequest;
import javax.servlet.http.HttpServletResponse;

public class MyInterceptor implements HandlerInterceptor {

    @Override
    public boolean preHandle(HttpServletRequest request, HttpServletResponse response, Object handler) throws Exception {
        System.out.println("preHandle 执行");
        return true;
    }

    @Override
    public void postHandle(HttpServletRequest request, HttpServletResponse response, Object handler, ModelAndView modelAndView) throws Exception {
        System.out.println("postHandle 执行");
    }

    @Override
    public void afterCompletion(HttpServletRequest request, HttpServletResponse response, Object handler, Exception ex) throws Exception {
        System.out.println("afterCompletion 执行");
    }
}
配置拦截器
在定义完拦截器后,我们还需要在 Spring MVC 的配置文件中使用 <mvc:interceptors> 标签及其子标签对拦截器进行配置,这样这个拦截器才会生效。在 Spring MVC 的配置文件中,<mvc:interceptors> 标签用于定义一组拦截器,其包含多个常用的子标签,具体说明如下表。
| 标签 | 一级子标签 | 二级子标签 | 说明 |
|---|---|---|---|
| <mvc:interceptors> | <bean> | - | <mvc:interceptors> 标签的子标签,用于定义一个全局拦截器,对所有的请求进行拦截。 |
| <ref> | - |
<mvc:interceptors> 标签的子标签,用于定义一个全局拦截器的引用,对所有的请求进行拦截。 <mvc:interceptors> 标签的 <ref> 子标签不能单独使用,它需要与 <bean> 标签(<mvc:interceptors> 标签内或 <mvc:interceptors>标签外)或 @Component 等注解配合使用,以保证<ref> 标签配置的拦截器是 Spring IOC 容器中的一个组件。 |
|
| <mvc:interceptor> | <mvc:mapping> |
<mvc:interceptor> 标签用于定义一个指定拦截路径的拦截器。 <mvc:mapping> 标签则是<mvc:interceptor> 的子标签,用来配置拦截器拦截的路径,该路径则是通过其属性“path”中定义的。例如,path 的属性值为“/**”时,表示拦截所有请求;而“/hello”则表示拦截路径为“/hello”的请求。 |
|
| <mvc:exclude-mapping> | <mvc:exclude-mapping> 为<mvc:interceptor> 的子标签,用来配置不需要被拦截器拦截的路径。 | ||
| <bean> | <bean> 为<mvc:interceptor> 的子标签,用来定义一个指定了拦截路径的拦截器。 |
在了解完 <mvc:interceptors> 标签及其子标签的含义后,接下来我们就来讲解如何通过它们来对拦截器进行定义。
1. 通过 <bean> 子标签配置全局拦截器
我们可以在 Spring MVC 的配置文件中,通过 <mvc:interceptors> 标签及其子标签 <bean> ,将我们自定义的拦截器配置成了一个全局拦截器。该拦截器会对项目内所有的请求进行拦截,配置代码如下。
<!--配置拦截器-->
<mvc:interceptors>
    <bean class="net.biancheng.c.interceptor.MyInterceptor"></bean>
</mvc:interceptors>
2. 通过 <ref> 子标签配置全局拦截器
除了 <bean> 标签外,我们还可以在 <mvc:interceptors> 标签中通过子标签 <ref> 定义一个全局拦截器引用,对所有的请求进行拦截。
<!--将自定义的拦截器放到 ioc 容器中-->
<bean id="interceptor" class="net.biancheng.c.interceptor.MyInterceptor"></bean>
<!--配置拦截器-->
<mvc:interceptors>
    <!--通过 ref 配置全局拦截器-->
    <ref bean="interceptor"></ref>
</mvc:interceptors>
注意:<mvc:interceptors> 标签的 <ref> 子标签不能单独使用,它需要与 <bean> 标签(<mvc:interceptors> 标签内或<mvc:interceptors>标签外)或 @Component 等注解配合使用,以保证 <ref> 标签配置的拦截器是Spring IOC 容器中的组件。
3. 通过<mvc:interceptor>子标签对拦截路径进行配置
我们还可以在 Spring MVC 的配置文件中通过 <mvc:interceptors> 标签的子标签 <mvc:interceptor>,对拦截器拦截的请求路径进行配置,示例配置如下。
<!--配置拦截器-->
<mvc:interceptors>
    <!--拦截器 1-->
    <mvc:interceptor>
        <!--配置拦截器拦截的请求路径-->
        <mvc:mapping path="/**"/>
        <!--配置拦截器不需要拦截的请求路径-->
        <mvc:exclude-mapping path="/login"/>
        <mvc:exclude-mapping path="/"/>
        <!--定义在 <mvc:interceptors> 下,表示拦截器只对指定路径的请求进行拦截-->
        <bean class="net.biancheng.c.interceptor.MyInterceptor"></bean>
    </mvc:interceptor>
</mvc:interceptors>
需要注意的是,在 <mvc:interceptor> 中,子元素必须按照上述代码的配置顺序进行编写,即
<mvc:mapping> → <mvc:exclude-mapping> → <bean> 的顺序,否则就会报错。其次,以上这三种配置拦截器的方式,我们可以根据自身的需求以任意的组合方式进行配置,以实现在 <mvc:interceptors> 标签中定义多个拦截器的目的。拦截器的执行流程
拦截器的执行流程如下图所示。图1:单个拦截器处理流程
拦截器处理流程的步骤如下:
- 当请求的路径与拦截器拦截的路径相匹配时,程序会先执行拦截器类(MyInterceptor)的 preHandl() 方法。若该方法返回值为 true,则继续向下执行 Controller(控制器)中的方法,否则将不再向下执行;
- 控制器方法对请求进行处理;
- 调用拦截器的 postHandl() 方法,此时我们可以对请求域中的模型(Model)数据和视图做出进一步的修改;
- 通过 DispatcherServlet 的 render() 方法对视图进行渲染;
- 调用拦截器的 afterCompletion () 方法,完成资源清理、日志记录等工作。
示例 1
下面我们就通过一个简单的实例,来验证下拦截器的处理流程,具体步骤如下。1. 新建一个名为 springmvc-interceptor-demo 的 Web 工程,并将与 Spring MVC 相关的依赖引入到工程中,其 web.xml 的配置内容如下。
<?xml version="1.0" encoding="UTF-8"?>
<web-app xmlns="http://xmlns.jcp.org/xml/ns/javaee"
         xmlns:xsi="http://www.w3.org/2001/XMLSchema-instance"
         xsi:schemaLocation="http://xmlns.jcp.org/xml/ns/javaee http://xmlns.jcp.org/xml/ns/javaee/web-app_4_0.xsd"
         version="4.0">

    <!--请求和响应的字符串过滤器-->
    <filter>
        <filter-name>CharacterEncodingFilter</filter-name>
        <filter-class>org.springframework.web.filter.CharacterEncodingFilter</filter-class>
        <init-param>
            <param-name>encoding</param-name>
            <param-value>UTF-8</param-value>
        </init-param>
        <init-param>
            <param-name>forceResponseEncoding</param-name>
            <param-value>true</param-value>
        </init-param>
    </filter>
    <filter-mapping>
        <filter-name>CharacterEncodingFilter</filter-name>
        <url-pattern>/*</url-pattern>
    </filter-mapping>

    <!--来处理 PUT 和 DELETE 请求的过滤器-->
    <filter>
        <filter-name>HiddenHttpMethodFilter</filter-name>
        <filter-class>org.springframework.web.filter.HiddenHttpMethodFilter</filter-class>
    </filter>
    <filter-mapping>
        <filter-name>HiddenHttpMethodFilter</filter-name>
        <url-pattern>/*</url-pattern>
    </filter-mapping>

    <!-- 配置SpringMVC的前端控制器,对浏览器发送的请求统一进行处理 -->
    <servlet>
        <servlet-name>dispatcherServlet</servlet-name>
        <servlet-class>org.springframework.web.servlet.DispatcherServlet</servlet-class>
        <!--配置 DispatcherServlet 的一个初始化参数:spring mvc 配置文件按的位置和名称-->
        <init-param>
            <param-name>contextConfigLocation</param-name>
            <param-value>classpath:springMVC.xml</param-value>
        </init-param>

        <!--作为框架的核心组件,在启动过程中有大量的初始化操作要做
            而这些操作放在第一次请求时才执行会严重影响访问速度
            因此需要通过此标签将启动控制DispatcherServlet的初始化时间提前到服务器启动时-->
        <load-on-startup>1</load-on-startup>
    </servlet>

    <servlet-mapping>
        <servlet-name>dispatcherServlet</servlet-name>
        <!--设置springMVC的核心控制器所能处理的请求的请求路径
        /所匹配的请求可以是/login或.html或.js或.css方式的请求路径
        但是/不能匹配.jsp请求路径的请求-->
        <url-pattern>/</url-pattern>
    </servlet-mapping>

</web-app>
2. 在 src 目录下(类路径下)新建一个 Spring MVC 的配置文件:springMVC.xml,配置内容如下。
<?xml version="1.0" encoding="UTF-8"?>
<beans xmlns="http://www.springframework.org/schema/beans"
xmlns:xsi="http://www.w3.org/2001/XMLSchema-instance"
xmlns:context="http://www.springframework.org/schema/context"
xmlns:mvc="http://www.springframework.org/schema/mvc"
xsi:schemaLocation="http://www.springframework.org/schema/beans
http://www.springframework.org/schema/beans/spring-beans.xsd
http://www.springframework.org/schema/context
https://www.springframework.org/schema/context/spring-context.xsd http://www.springframework.org/schema/mvc https://www.springframework.org/schema/mvc/spring-mvc.xsd">
<!--开启组件扫描-->
<context:component-scan base-package="net.biancheng.c"></context:component-scan>
<!-- 配置 Thymeleaf 视图解析器 -->
<bean id="viewResolver"
class="org.thymeleaf.spring5.view.ThymeleafViewResolver">
<property name="order" value="1"/>
<property name="characterEncoding" value="UTF-8"/>
<property name="templateEngine">
<bean class="org.thymeleaf.spring5.SpringTemplateEngine">
<property name="templateResolver">
<bean class="org.thymeleaf.spring5.templateresolver.SpringResourceTemplateResolver">
<!-- 视图前缀 -->
<property name="prefix" value="/WEB-INF/templates/"/>
<!-- 视图后缀 -->
<property name="suffix" value=".html"/>
<property name="templateMode" value="HTML5"/>
<property name="characterEncoding" value="UTF-8"/>
</bean>
</property>
</bean>
</property>
</bean>
<!-- view-name:设置请求地址所对应的视图名称-->
<mvc:view-controller path="/hello" view-name="success"></mvc:view-controller>
<!-- 当SpringMVC中设置任何一个view-controller时,其他控制器中的请求映射将全部失效,此时需要在SpringMVC的核心配置文件中设置开启mvc注解驱动的标签-->
<mvc:annotation-driven></mvc:annotation-driven>
<!-- <!–静态资源映射–>-->
<mvc:default-servlet-handler/>
<!--配置拦截器-->
<mvc:interceptors>
<!--拦截器 1-->
<mvc:interceptor>
<!--配置拦截器拦截的请求路径-->
<mvc:mapping path="/**"/>
<!--配置拦截器不需要拦截的请求路径-->
<mvc:exclude-mapping path="/login"/>
<mvc:exclude-mapping path="/"/>
<!--定义在 <mvc:interceptors> 下,表示拦截器只对指定路径的请求进行拦截-->
<bean id="interceptor" class="net.biancheng.c.interceptor.MyInterceptor"></bean>
</mvc:interceptor>
</mvc:interceptors>
</beans>
3. 在 net.biancheng.c.interceptor 包下,新建一个自定义拦截器类 MyInterceptor,代码如下。
package net.biancheng.c.interceptor;

import org.springframework.stereotype.Component;
import org.springframework.web.servlet.HandlerInterceptor;
import org.springframework.web.servlet.ModelAndView;

import javax.servlet.http.HttpServletRequest;
import javax.servlet.http.HttpServletResponse;

@Component
public class MyInterceptor implements HandlerInterceptor {

    @Override
    public boolean preHandle(HttpServletRequest request, HttpServletResponse response, Object handler) throws Exception {
        System.out.println("MyInterceptor----> preHandleO() 执行");
        return true;
    }

    @Override
    public void postHandle(HttpServletRequest request, HttpServletResponse response, Object handler, ModelAndView modelAndView) throws Exception {
        System.out.println("MyInterceptor----> postHandle() 执行");
    }

    @Override
    public void afterCompletion(HttpServletRequest request, HttpServletResponse response, Object handler, Exception ex) throws Exception {
        System.out.println("MyInterceptor----> afterCompletion() 执行");
    }
}
4. 在 webapp/WEB-INF 目录下,新建一个 templates 目录,并在该目录下新建一个 success.html,代码如下。
<!DOCTYPE html>
<html lang="en" xmlns:th="http://www.thymeleaf.org">
<head>
    <meta charset="UTF-8">
    <title>Title</title>
</head>
<body>
<h1>访问成功!</h1>
</body>
</html>
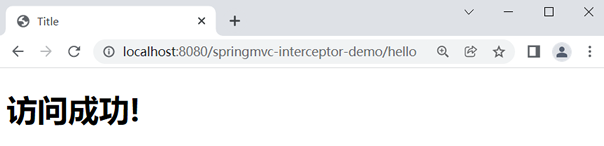
5. 将 springmvc-interceptor-demo 部署到 Tomact 中并启动,启动完成后,使用浏览器访问“http://localhost:8080/springmvc-interceptor-demo/hello”,结果如下图。
图2:访问成功
6. 查看控制台,控制台输出如下。
MyInterceptor----> preHandleO() 执行
MyInterceptor----> postHandle() 执行
MyInterceptor----> afterCompletion() 执行
多个拦截器的执行流程。
在大型的企业级项目中,通常都不会只有一个拦截器,开发人员可能会定义许多不同的拦截器来实现不同的功能。在程序运行期间,拦截器的执行是有一定的顺序的,该顺序与拦截器在配置文件中定义的顺序有关。假设一个项目中包含两个不同的拦截器:Interceptor1 和 Interceptor2,它们在配置文件中定义的顺序为:Interceptor1 → Interceptor2。下面我们就通过一个拦截器流程图来描述下多个拦截器的执行流程。
图3:多个拦截器的执行流程
从上面的执行流程图可以看出,当存在多个拦截器同时工作时,它们的 preHandle() 方法会按照拦截器在配置文件中的配置顺序执行,但它们的 PostHandle() 和 afterCompletion() 方法则会按照配置顺序的反序执行。
如果其中有拦截器的 preHandle() 方法返回了 false,各拦截器方法执行情况如下。
- 第一个返回 preHandle() 方法 false 的拦截器以及它之前的拦截器的 preHandle() 方法都会执行。
- 所有拦截器的 postHandle() 都不会执行。
- 第一个返回 preHandle() 方法 false 的拦截器之前的拦截器的 afterComplation() 方法都会执行。
示例 2
下面,我们就通过一个简单的实例,来验证下多个拦截器的执行流程。1. 在springmvc-interceptor-demo 的 net.biancheng.c.interceptor 包中,除了示例 1 中创建的 MyInterceptor 外,再创建两个拦截器类:MyInterceptor2 和 MyInterceptor3。
拦截器类 MyInterceptor2 的代码如下。
package net.biancheng.c.interceptor;

import org.springframework.stereotype.Component;
import org.springframework.web.servlet.HandlerInterceptor;
import org.springframework.web.servlet.ModelAndView;

import javax.servlet.http.HttpServletRequest;
import javax.servlet.http.HttpServletResponse;

@Component
public class MyInterceptor2 implements HandlerInterceptor {

    @Override
    public boolean preHandle(HttpServletRequest request, HttpServletResponse response, Object handler) throws Exception {
        System.out.println("MyInterceptor2----> preHandleO() 执行");
        return true;
    }

    @Override
    public void postHandle(HttpServletRequest request, HttpServletResponse response, Object handler, ModelAndView modelAndView) throws Exception {
        System.out.println("MyInterceptor2----> postHandle() 执行");
    }

    @Override
    public void afterCompletion(HttpServletRequest request, HttpServletResponse response, Object handler, Exception ex) throws Exception {
        System.out.println("MyInterceptor2---> afterCompletion() 执行");
    }
}
拦截器类 MyInterceptor3 的代码如下。
package net.biancheng.c.interceptor;

import org.springframework.stereotype.Component;
import org.springframework.web.servlet.HandlerInterceptor;
import org.springframework.web.servlet.ModelAndView;

import javax.servlet.http.HttpServletRequest;
import javax.servlet.http.HttpServletResponse;

@Component
public class MyInterceptor3 implements HandlerInterceptor {

    @Override
    public boolean preHandle(HttpServletRequest request, HttpServletResponse response, Object handler) throws Exception {
        System.out.println("MyInterceptor3----> preHandleO() 执行");
        // 返回值设置为 false
        return false;
    }

    @Override
    public void postHandle(HttpServletRequest request, HttpServletResponse response, Object handler, ModelAndView modelAndView) throws Exception {
        System.out.println("MyInterceptor3----> postHandle() 执行");
    }

    @Override
    public void afterCompletion(HttpServletRequest request, HttpServletResponse response, Object handler, Exception ex) throws Exception {
        System.out.println("MyInterceptor3---> afterCompletion() 执行");
    }
}
2. 修改 Spring MVC 配置文件 springMVC.xml 的内容,在 <mvc:interceptors> 标签中增加 MyInterceptor2 和 MyInterceptor3 的配置,代码如下。
<?xml version="1.0" encoding="UTF-8"?>
<beans xmlns="http://www.springframework.org/schema/beans"
xmlns:xsi="http://www.w3.org/2001/XMLSchema-instance"
xmlns:context="http://www.springframework.org/schema/context"
xmlns:mvc="http://www.springframework.org/schema/mvc"
xsi:schemaLocation="http://www.springframework.org/schema/beans
http://www.springframework.org/schema/beans/spring-beans.xsd
http://www.springframework.org/schema/context
https://www.springframework.org/schema/context/spring-context.xsd http://www.springframework.org/schema/mvc https://www.springframework.org/schema/mvc/spring-mvc.xsd">
<!--开启组件扫描-->
<context:component-scan base-package="net.biancheng.c"></context:component-scan>
<!-- 配置 Thymeleaf 视图解析器 -->
<bean id="viewResolver"
class="org.thymeleaf.spring5.view.ThymeleafViewResolver">
<property name="order" value="1"/>
<property name="characterEncoding" value="UTF-8"/>
<property name="templateEngine">
<bean class="org.thymeleaf.spring5.SpringTemplateEngine">
<property name="templateResolver">
<bean class="org.thymeleaf.spring5.templateresolver.SpringResourceTemplateResolver">
<!-- 视图前缀 -->
<property name="prefix" value="/WEB-INF/templates/"/>
<!-- 视图后缀 -->
<property name="suffix" value=".html"/>
<property name="templateMode" value="HTML5"/>
<property name="characterEncoding" value="UTF-8"/>
</bean>
</property>
</bean>
</property>
</bean>
<!-- <!– view-name:设置请求地址所对应的视图名称–>-->
<mvc:view-controller path="/hello" view-name="success"></mvc:view-controller>
<!-- 当SpringMVC中设置任何一个view-controller时,其他控制器中的请求映射将全部失效,此时需要在SpringMVC的核心配置文件中设置开启mvc注解驱动的标签-->
<mvc:annotation-driven></mvc:annotation-driven>
<!-- <!–静态资源映射–>-->
<mvc:default-servlet-handler/>
<!--配置拦截器-->
<mvc:interceptors>
<!--拦截器 1-->
<mvc:interceptor>
<!--配置拦截器拦截的请求路径-->
<mvc:mapping path="/**"/>
<!--配置拦截器不需要拦截的请求路径-->
<mvc:exclude-mapping path="/login"/>
<mvc:exclude-mapping path="/"/>
<!--定义在 <mvc:interceptors> 下,表示拦截器只对指定路径的请求进行拦截-->
<bean class="net.biancheng.c.interceptor.MyInterceptor"></bean>
</mvc:interceptor>
<!--拦截器 MyInterceptor2-->
<mvc:interceptor>
<!--配置拦截器拦截的请求路径-->
<mvc:mapping path="/**"/>
<!--配置拦截器不需要拦截的请求路径-->
<mvc:exclude-mapping path="/login"/>
<mvc:exclude-mapping path="/"/>
<!--定义在 <mvc:interceptors> 下,表示拦截器只对指定路径的请求进行拦截-->
<bean class="net.biancheng.c.interceptor.MyInterceptor2"></bean>
</mvc:interceptor>
<!--拦截器 MyInterceptor3-->
<mvc:interceptor>
<!--配置拦截器拦截的请求路径-->
<mvc:mapping path="/**"/>
<!--配置拦截器不需要拦截的请求路径-->
<mvc:exclude-mapping path="/login"/>
<mvc:exclude-mapping path="/"/>
<!--定义在 <mvc:interceptors> 下,表示拦截器只对指定路径的请求进行拦截-->
<bean class="net.biancheng.c.interceptor.MyInterceptor3"></bean>
</mvc:interceptor>
</mvc:interceptors>
</beans>
3. 重启 Tomcat 服务器,并使用浏览器访问“http://localhost:8080/springmvc-interceptor-demo/hello”,控制台输出如下。
MyInterceptor----> preHandleO() 执行
MyInterceptor2----> preHandleO() 执行
MyInterceptor3----> preHandleO() 执行
MyInterceptor2----> afterCompletion() 执行
MyInterceptor----> afterCompletion() 执行
从控制台输出的内容可知:
- 由于这三个拦截器在 Spring MVC 的配置文件中是按照 MyInterceptor → MyInterceptor2 → MyInterceptor3 的顺序配置的,因此这三个拦截器的执行顺序也是 MyInterceptor → MyInterceptor2 → MyInterceptor3;
- 由于 MyInterceptor3 的 preHandle() 方法返回的是 false,因此 MyInterceptor3 和它之前的拦截器 MyInterceptor 和 MyInterceptor2 中的 preHandle() 都会执行。
- 由于 MyInterceptor3 的 preHandle() 方法返回的是 false,因此 MyInterceptor、MyInterceptor2 和 MyInterceptor3 的 postHandle() 方法都不会执行。
- 由于 MyInterceptor3 的 preHandle() 方法返回的是 false,因此只有 MyInterceptor 和 MyInterceptor2 的 afterCompletion() 方法执行了。